Pages

Friday, March 22, 2013

Donut Day: Etsy roundup!

Edible donuts are wonderful, but there's something to be said for non-edible donuts that you can keep forever (or at least a lot longer than the real kind). I was browsing Etsy and found all kinds of great hand-made donut-inspired items, so since it's Donut Day, I want to share some of my favorites with you.

Via soapopotamus
Via Whipped Up Wonderful

These are both soap! The one on the left is by Soapopotamus and the one on the right is by Whipped Up Wonderful. They look so delicious that I would have a hard time keeping myself from taking a bite, especially since they're also donut scented. Apparently donut soap is a thing - lots of the listings I found on Etsy were for donut-shaped and -scented soap.

Via Sweet Art Miniatures

Moving on from bath products to hair accessories, I thought these donut bobby pins from Sweet Art Miniatures were adorable. I don't even wear bobby pins, but I would make an exception for these.

Via Self Rescuing Princess

Polymer clay really lends itself well to tiny donuts. These donut charms from Self Rescuing Princess were some of my favorites that I found - I like that you can choose between a Krispy Kreme and a Voodoo Doughnut box. I think these would be fun to have as stitch markers!

Via Emariecreations

One more cute polymer clay mini-donut thing: pushpins! These are from Emariecreations. I've never seen donutty pushpins before, but I can't think why not. These are perfect.

Via BeesFeltMarket

Moving on from polymer clay to fiber: I love these felt play food donuts from Bees Felt Market. What an awesome bakery you could pretend to have.

Via FidoTheCat

Kitties also deserve felt donut toys! These ones from Fido The Cat are filled with catnip, of course. I know my cat would go crazy for them, especially given how much she loved the donut I made her.

Via NerdStitch

And last but not least, something very close to my heart: adorable amigurumi coffee and donut by NerdStitch. They look so happy together!

I hope you enjoyed my Etsy donut round up. I encourage you to visit the shops I linked here - even if donuts aren't your thing, they all offer other cute and/or yummy things to look at.

Thursday, March 21, 2013

Yellow friend

It's been a long time since I've crocheted any amigurumi, and even longer since I made one for myself. I've been stuck in this limbo where I want to make my own designs, but that's still a bit intimidating, and I've also mostly filled up my designated "amigurumi shelf." In other words, I've still been queueing and saving patterns but I haven't felt that enthusiastic about starting any of them.

Until now!


This is my little yellow friend. He is crocheted using Karissa Cole's free Skittles pattern, in some Caron Simply Soft. He's only two inches tall - so adorable and tiny! I like this pattern because it uses a couple of unusual techniques to get that cute effect. The arms and antennae are just strands of yarn with strategic knots, and the body is not stuffed with stuffing, just yarn ends from his appendages. This keeps the body from being too roly-poly and allows the little guy to sit nicely.


I liked my yellow friend so much that I immediately had to make another. From start to finish, my red friend took only an hour or less, during knitting night at my LYS (sadly, that's not my stash in the picture). It's a great quick and portable project, because it's so small and doesn't use much stuffing.

Expect to see more little friends soon in all the colors of yarn that I have!

Wednesday, March 20, 2013

WIP Wednesday: Socks and a secret


I skipped WIP Wednesday last week, partly because these socks were giving me such a hard time. I'm not sure I can even call them these socks, because I restarted and ripped them out so many times that I had to throw away the first few yards of yarn from this skein. I don't know what it was, but for some reason I had a huge crisis of confidence about whether my gauge was right. As I've mentioned before, I've been trying not to knit so tightly, so I'm making these socks on US 1 1/2 needles from Knit Picks, down from my usual 2s. Now that I've gotten this far, I think I can say that I will either switch back to size 2 needles for my next pair, and/or go back to the ChiaoGoo RED Lace ones that I have been pretty happy with before. I wanted to try some Knit Picks needles just to see if I liked them better, and I thought that slicker needles would help with my tension. But actually, I'm finding that I can't knit as loosely as I'd like because I feel like the yarn is getting away from me.

All that aside, I'm pretty happy with these socks now that they're behaving. The yarn is GnomeAcres House Gnome in Lucky Ewe and I love it, of course. I think it's meant as a St. Patrick's Day colorway, but to me it looks like the colors of daffodils just starting to bloom, so I'm calling these my Daffodil Socks. The pattern I'm using is Jeck, by Regina Satta, and I'm enjoying it too. Originally, I was using the Hermione's Everyday Socks pattern, but I didn't think the texture of that pattern was really working with this yarn. I'm glad I switched because I think the yarn suits Jeck nicely.


I'm also working on a secret project that I can't say too much about, because it's a present. This project involves a few techniques I haven't done before, including cables, and needs to come out a certain size. I think I've learned my lesson about making presents - I always want them to come out really nice, but if I'm learning something new while making the actual present, I usually end up feeling a little frustrated even if the recipient is happy with it. So, I'm doing a test run with some stash yarn in the same weight as the yarn I plan to use. It's going well, and I think a lot of that is due to not putting pressure on myself to make a brand-new-to-me project come out perfectly.

Check out more work-in-progress posts at Tami's Amis!

Tuesday, March 19, 2013

FO Flashback: other crochet and knitting

Here's part two of my March FO Flashback. Today I'm revisiting the non-amigurumi things I finished in March of previous years. First up are my crocheted fingerless gloves from 2010.


These are from Ria Saakshi's Firecracker Gloves pattern, crocheted in The Fibre Company Canopy Fingering. This yarn was my very first purchase from a local yarn store! Up until then I had been crocheting with yarn from craft stores, but I decided to make a trip to fibre space in Alexandria. I remember feeling very awkward, because I was "only" a crocheter and didn't understand all the different names for yarn weights and didn't know what yarn would be the best choice for this project. I know now that the people who work at fibre space would have been happy to help me, but at the time I was too shy. I also didn't know about winding skeins, so that made for fun times.

I wasn't very happy with these gloves when I finished them, but I like them well enough now. I don't wear them often, but that's because I just don't wear these type of gloves very much.


Last March, I finished both my Manhattan cowl and my Diamond Ridges hat (I blogged about the cowl here and the hat here). At the time, I wasn't sure whether I would get much use out of either of these accessories, because they weren't the type of things I had made before or tended to wear often - and I finished them at the end of winter, so it seemed likely that I would have lost interest in them by the time it was cold enough to wear them again. But, I've been wearing and loving both of them! The cowl gets less use, but I took it to Japan with me in November and wore it on the long plane trips, when it was so nice to have something cozy to wrap up in. I've been wearing the hat all winter, and I love it. Before I made it, I didn't wear hats much, and I thought that I just didn't like hats. Turns out, I like to wear hats when I have hats that I like!

I should also note that I finished my rag rug experiment in March of 2011. Let's not talk about that too much. I think I gave it to my mom to use/donate to a cat shelter/dispose of - in any case, I don't have it any more!

Monday, March 18, 2013

FO Flashback: amigurumi

Time to revisit my FOs from March in years past! I have several amigurumi, but only one that hasn't shown up on my blog before:


This is Ebirt. For a few brief years, Colonel Ebirt was my college's mascot, but these years coincided almost exactly with my time in school, so Ebirt is forever our one and only mascot in my mind. A couple years after I graduated, I decided to crochet my own little Ebirt. This was the first time I crocheted something without a pattern - I did use the Amigurumi Dude pattern to get his head started, but I improvised the rest. I was, and still am, very happy with how he came out. He's been to campus for a few visits, but these days he hangs out on my amigurumi shelf with the rest of his buddies.

Ebirt visits Lord Botetourt
Ebirt goes to see TJ
Ebirt visits Thomas Jefferson


In March of 2011, I finished my baby bunny and my ninja, both of which I blogged about previously. Not much has happened in the baby bunny's life. At some point I gave him a pink ribbon to wear around his neck, and he spends his time sitting next to my other bunny that I made from the same pattern. The ninja technically belongs to my boyfriend, but it turns out he's also just sitting on my amigurumi shelf these days. Don't ask me how he got there (he's a ninja).


Last March, I finished my kitty, which I blogged about last May after giving him to my mom as a Mother's Day present. As I mentioned there, I designed him to look like my mom's old cat. He lives in my parents' house with the other things I've made over the years. I had, and maybe still have, grand plans to make more cats with that pattern to look like our other kitties. One is currently a WIP that I always intend to pick up again and never manage to, so if I ever do get that done, I might reevaluate my plans to make another two more (we are a cat family).


And, I also finished Nessie last March! Nessie is currently living in Scotland with my friend, and even got to go visit Loch Ness last year. I'm hoping to share some of those photos here, so I'll save that for another post.

Sunday, March 17, 2013

Pittsburgh Knit & Crochet Festival

On Saturday, I went to my first-ever yarn event, the Pittsburgh Knit and Crochet Festival. And... I'm already excited for next year's! Since this was my first time going to something like this, I mostly just visited the market. I'd like to take classes next time (the ones that sounded interesting to me were already full when I registered this year) and maybe spend more time just hanging out. In addition to doing some shopping, I did get to meet Stacey of FreshStitches and Emily of the Whatcha Swatchin podcast, so that was fun. And of course, seeing so much beautiful yarn in one place, both for sale and made into things that the attendees were wearing, was a great reason in itself to go.

SpaceCadet Creations Lucina in Happy Happy Sunshine

Speaking of beautiful yarn... I did some stash enhancement at the market, of course. I had some Christmas cash I was  still hanging on to, so I took that to be my spending limit/goal. I knew I definitely wanted some SpaceCadet Creations yarn, so I went to that booth right away. I've been attracted to yellowy-pink yarn lately (maybe I'm ready for spring) so this is perfect. Plus, sparkles!

Kia Ora Kiwi Fingering

Then I found some Zealana yarn being sold by Susan's Fiber Shop. I haven't encountered this yarn before but the Kia Ora line has possum fiber in it! I picked up a couple balls of Kiwi Fingering which are very light and soft. I think it might make good mitts.

Ball and Skein Glissade in Elderberry

I also visited Ball and Skein's booth. They have so many beautiful colors of yarn that it took me several visits and a long internal debate to decide on the skein I wanted. I saw a lot of other people doing the same thing as me, standing there with two or three different colors and trying to pick between them. In the end, I got a skein of their Glissade yarn (a fingering weight 50% silk, 50% merino blend) in Elderberry. I was trying to avoid getting more purple since I always gravitate to purple, but this is such a beautiful color that I had to have it.


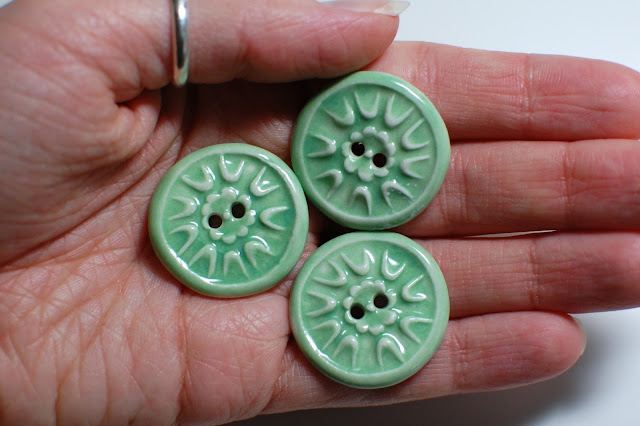
I also found a few non-yarn things that I needed. First, these hand-made buttons by Melissa Jean. No idea what I'll do with them, but they're pretty just to look at even if I never come up with a project.


And, a pair of earrings made from knitting needles by Sassafras Creations. This is the kind of upcycled jewelry I like. If you don't know that it's made from recycled knitting needles, then it just looks like interesting beads, but if you do know its story, then it's something extra to enjoy about them.

I'm really glad I was able to go to the festival, and as I said, I'm already looking forward to the next one. And maybe I'll get to go to another festival before then - I'd like to go to some of the bigger ones soon!

Wednesday, March 13, 2013

Dragon eyes

Whenever I make amigurumi, the moment I put on its eyes is the moment it gains life. Before that, it's just some balls of crochet, but with eyes, it suddenly has personality.


Sadly for these dragons, they spent years without any eyes at all. I always planned to embroider eyes on them, but my embroidery abilities leave something to be desired, so I was reluctant to just go through with it. I imagined that someday, in some magical craft store somewhere, I'd find the perfect beads or plastic gems or something to make their eyes. But, that day never came, and I finally decided that my dragons would be better off with not-so-beautiful embroidered eyes than spending the rest of their lives sightless.

Because I always intended to make eyes, the two bigger dragons were listed as WIPs on my Ravelry page, at 95% completion. It felt so, so good to change them to finished projects, and update them with photos that showed their new eyes!


The two big dragons were made using the original version of Lucy Ravenscar's Fierce Little Dragon pattern. The smaller dragon is the Mighty & Ferocious Dragon pattern. Both of them are great patterns that I've used multiple times, and they're free. If you make your own, just be kind enough to give them their eyes right away and not make them wait for years.

Tuesday, March 12, 2013

Finished blanket


My latest stash-busting blanket is all done. I thought a border would tidy things up a bit, so I just did a single row of double crochet in red around the edges, and I do think it looks nice and clean now. I'm happy with this blanket - it makes you warm just to look at it! (I'm not really happy with calling it my "blinding blanket," but the name kind of stuck. Any better ideas? Blazing blanket maybe?)

Monday, March 11, 2013

Quick project: turn your pins into magnets

I have a little collection of pins I've picked up here and there, which spend their time sitting in a drawer. My pin-wearing days are far behind me, and I don't have a corkboard or anything to attach them to. But I do have a fridge, and a magnetic panel on my craft desk, so I decided that if I changed my pins into magnets, I could stick them somewhere that I would be able to see and enjoy them.

Start here: magnets and pins!

This is a pretty straightforward project, and very easy if you have access to small wire clippers and pliers. Start with your pins and some magnets. These ones are 3/4" across and I got a package of eight for about $2.

Step 1

Use your pliers to grab one end of the U-shaped catch on the back of the pin. Bend it open, kind of like straightening a paper clip. I couldn't get a photo of this step, but you want to bend it until you get it looking like the picture above.

Step 2

Next, use your wire clippers to snip this bent piece off, as close to the flat back of the pin as possible.

Step 3

Also Step 3

Then, use your pliers to grab the hinge part of the pin. Pull the pin out (you may need to wiggle it a little to get it out). Dispose of your sharp pin parts somewhere safe!

Step 4

Now just put some glue on one side of your magnet, and stick it to the back of your pin. I used Elmer's Glue-All - you can use something stronger, or you can actually just skip the glue all together, since the magnet will hold onto the pin.

Another set of pins that I turned into magnets. These are a bit smaller,
so I used some smaller magnet pieces that I had already.

Wait for the glue to dry, then enjoy your new magnets!

Friday, March 8, 2013

Donut Day: Donuts in Japan

Happy Donut Day, everyone! I hope you have something sweet to enjoy today, donut or otherwise.

I thought it might be fun to share some donutty goodness here, so for today's Donut Day, I'll talk a little bit about my donut experiences in Japan. Whenever I travel, I try to hit up 1) yarn stores and 2) donut shops, and while I didn't find much yarn I wanted to buy in Japan, I more than made up for it in donuts.


I had heard of Mister Donut before traveling to Japan, and based on the name alone, I put it on my list of essential places to visit. According to Wikipedia, Mister Donut was founded in the States, and its U.S. locations later turned into Dunkin' Donuts. It's been the main donut chain in Japan since the 1970s (check out their very thorough history on their website - I used Google Translate).

We went to Mister Donut a couple of times, and the donuts were pretty good. They were less sweet and dense than the donuts I'm used to, and a little smaller. The pink glaze in the picture is strawberry, and is the same creamy coating that seems to be on all Japanese strawberry-flavored treats. If you like a less intense donut, you would probably enjoy these. I didn't sample the "pon de ring" donut that they are famous for, but maybe next time.

Image from Doughnut Plant.

We also made a stop at the Shinjuku location of Doughnut Plant, the New York-based specialty donut store. On our trip to New York in 2010, we made a pilgrimage to the Doughnut Plant store on the Lower East Side, only to find that it was closed on Mondays. I was sad. Fortunately, the shop in Shinjuku was open when we found it. We got a green tea flavored donut to sample, and I have to say, I wasn't that impressed. Maybe green tea flavor doesn't work that well as donut glaze. I also found the donut itself a little too solid and cakey (I like yeast-y donuts best). I do think Doughnut Plant is worth a try, but after two years of anticipation, it didn't live up to my hopes.


I'm embarrassed to admit that my favorite donuts in Japan came from Krispy Kreme. I can get Krispy Kreme right here in the States! But, I don't know, not only did the donuts seem a little tastier, but the experience of being in the stores was nicer, too. I don't spend a lot of time in Krispy Kreme stores here, and when I do, I kind of feel like I'm the only person there. I guess in America, donut stores are more for picking up a dozen on your way to work than for sitting and enjoying a treat. The Krispy Kreme stores that we went to in Tokyo always had lots of people in them, though (part of this, I'm sure, is that there are just many more people in Tokyo in the first place). It was nice to be with lots of other people also enjoying their donuts.

By chance, our hotel was very close to the Shinjuku Krispy Kreme, so we ate a lot of donuts. Donut day, every day (it was okay because we were walking several miles each day, right?). Part of the appeal was that they were selling their special Christmas donuts, and could you resist that adorable snowman, especially if you walked past him every time you went to or from the train station? He was delicious and filled with chocolate cream. So, so good.

Cat donuts at Floresta. Image from Serious Eats via @floresta_mama.

One place we didn't get to on this trip was Floresta. They are known for using natural ingredients in their donuts, and for making the adorable cat-shaped donuts that the Internet discovered a couple years ago. I spotted one of their stores in Kyoto from the bus window, but that was as close as we came. If we make it back to Japan, Floresta will be at the top of my donut list.

I hope you enjoyed my Japanese donuts mini-review! The next Donut Day is two weeks from today and I'll have another donut topic to chat about.

Wednesday, March 6, 2013

WIP Wednesday: Blinding blanket

Sometimes, stash-busting produces something surprisingly pretty, like my granny square afghan from last year. And sometimes, it produces this:


This is the majority of my surviving Caron Simply Soft collection, being turned into a lap blanket, because who doesn't need a crazy-loud lap blanket? I wasn't planning to use all of these colors in the same project, but I was reorganizing my stash box and they fell in a pile together. And I thought, "Why not?"


I'm using Mam'zelle Flo's instructions to make this, but it's just diagonal box stitch, which I used once before to make a (much more tasteful) scarf. I'll probably have enough red left over to make a border around the whole thing, which might make it look a little less crazy?


You know, I kind of like it. Yes, I'm trying to use up these skeins because they're not colors I really want to work with these days, and yes, I semi-intentionally chose the busiest possible pattern to put them in. But like my Garnet shawl, it's fun to use colors I don't usually work with, even when this is the result.


Check out more work-in-progress posts at Tami's Amis!

Tuesday, March 5, 2013

Garnet


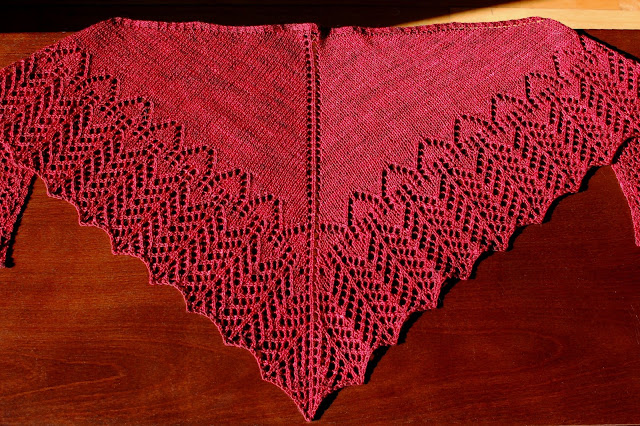
I am so excited to share this finished project with you. Making this shawl was one of those times when the pattern, the yarn, and the process all work so well together, and each turns out to be even better than I was expecting.

The pattern is Robin Ulrich's Amethiste shawl. It's available for purchase on Ravelry and I urge you, if you like to make shawls with geometric, lacy elements, you should make this one! This is a very well-written pattern, with lots of helpful notes and no errors that I could find. I think it would be a good pattern to check out if you're a beginner, because it's easy to follow with very nice results. The difficulty I have with lace is not being able to "see" my work as I'm knitting, but with this pattern, the lace design came out very clearly and it was easy to tell if I was about to make a mistake.


And the yarn... yum. This is the madelinetosh tosh sock that I bought back in October. I went into the store thinking I'd probably get one of the cream or light blue colorways, and I walked out with Tart. As you can probably tell by my projects (and my blog's layout), I like purples, greens, and blues, and tend to ignore everything else. But I love this color of red and it was such a refreshing treat to see it in my hands as I worked on this shawl.

Maybe because I was so happy with the pattern and the yarn, my knitting went really smoothly. That's not to say I didn't make a couple of mistakes, but in a landmark event, I was able to diagnose the problem, drop down, and fix it, despite working in lace! I was so thrilled the first time I had to do this that I didn't even mind when I had to make the same correction a few rows later. Plus, I've been trying to control my tension, and I think it shows here. It's very drapey and the lace opened up just like I wanted with blocking - and stayed open, unlike some of my tighter lace attempts.


I bought enough yarn to make the full-size shawl, but opted instead for the shawlette, because I think that size is more versatile and suits me a little better. I can't wait to wear it!

(Apologies for the not-super-inspiring pictures. It's a little too big to photograph easily by myself, and it's a little too cold to go outside and do a photo shoot.)