Pages

Thursday, February 28, 2013

Allow me to show you something awesome

I follow a few blogs and Pinterest accounts that post about home design and put up nice pictures of thoughtfully-decorated living spaces, but honestly, most of them don't hold my attention for long. Maybe it's because I've been a renter all of my adult life and will be for the foreseeable future, or maybe I'm overwhelmed by the time and talent it must take to get your house looking so nice.

Or maybe it's because I have the design aesthetics of a three-year-old.


Behold, my dinosaur clock! I bought this tiny white clock at IKEA for 99 cents, because we needed something in the office to tell time (yes, the computers are in there, but sometimes we're playing a game full screen and can't see the desktop clock).

I consider most blank, flat surfaces to be empty canvases waiting to be sticker'd. This seems to be something I inherited from my grandmother, because wherever she goes, stickers are left behind. My plain little white clock was just crying out for decoration, so I went to a store in my neighborhood that sells cute Japanese stuff and, after much deliberation, chose these excellent dinosaur stickers.


Unfortunately, as soon as I put the stickers on the clock, they started dropping off again. But I was not about to let my clock go back to being naked, so I spent a while carefully spreading glue on the back of each sticker with a toothpick and re-attaching them.

So far, so good! I know it looks silly, but it makes me smile to see all the little dinos.

Wednesday, February 20, 2013

Sashiko

Sashiko in progress

Sashiko is a type of Japanese embroidery that was originally developed to reinforce fabric, and traditionally uses repeating geometric designs worked in white thread on dark blue fabric. I like the simplicity of the patterns and colors so I wanted to try it for myself, even though I'm not very good at embroidery. So, I got a sashiko sampler kit and just finished it the other day, after a couple months of working on it on and off.

I found it both easy and challenging - easy, because the whole thing is running stitch, worked in straight lines, and the guides are printed onto the fabric to follow. And challenging, because as with many Japanese art forms, there are very precise rules about how to do it right. The stitches are supposed to be all the same size, maintaining a certain proportion between the stitches on the right side and the wrong side of the fabric, and there are particular ways you're supposed to do corners that make them look tidy. Since this was my first try at sashiko, and one of the only embroidery projects I've ever done, I spent a lot of time fiddling with my needle and working very hard to get my stitches as close to the same size as I could.

All done

I'm sure that once you get good at it, or even if you're already used to embroidery, it's easy to handle the mechanics of it and you can just enjoy the process. If you're interested in sashiko, there are a couple of websites dedicated to it: Studio Aika and Sashiko Stitchers. My kit was purchased from TaDaaStudios, which has a nice selection of different kits that include instructions in English. There are also kits and a tutorial available from Purl Soho.

Now that my sampler is finished up, I'm not sure what I'll do with it. The kit suggests making it into a pillow, which is a nice idea but I don't really need another decorative pillow right now. I'm thinking about framing it and maybe hanging it along with some other pictures and art - in some combination that will distract from my not-so-even stitches!

Monday, February 18, 2013

Grey Loop

I would like to knit more for other people, now that I feel a little more confident in my abilities and have more than enough accessories for myself (for now!). So, I've been looking through the projects I like on Ravelry and the yarn at my LYS and trying to think of what would appeal to people I know. I've been wanting to make A Grey Loop for a while and it looked like something my sister might enjoy, so I showed the pattern pictures to her over Christmas and she seemed to like it.


I made it for her birthday, but unfortunately it ended up being even less of a surprise for her than it already was, because I convinced myself it was awful and sent her pictures of it first to make sure she really wanted it.

What happened was, it turned out at least six inches longer than I wanted or expected. This is my fault, because I was using a different yarn and needle and instead of being responsible and making (and blocking) a gauge swatch, I just guesstimated how many extra stitches I would add to what the pattern called for. The messed-up result should not be surprising to anyone, but it was to me, when I finished blocking it and put it on and felt like it was hanging down to my knees. My first thought was IT IS RUINED and I immediately began plotting to rip apart the whole thing and at least try to salvage the yarn. After sleeping on it, I came to my senses and checked with my sister first, and she liked the pictures and loves the cowl.

So much for my confidence in my abilities.

I think part of my problem is that I had a bit of a rough time with this project from the start. The pattern contains "a mistake of epic proportions" (in the words of the pattern writer!) and instead of correcting that mistake, she just kind of suggested a few fixes. That threw me off a little, and I ended up just using another Raveler's modifications as my pattern. I also can't say that it's 100% mistake-free (I never can say that, but I always want to).

But really, now that it's done and with my sister, I feel pretty good about it. And it doesn't hurt that I love the yarn - it's Canopy Fingering by The Fibre Company, and it's so soft and pretty. And I got it on sale at my LYS for 40% off! So of course, I bought a couple skeins for myself too, in a different colorway. I'm thinking I might use some of that for the Glorious Cabled Mitts pattern that I've had queued forever, but now it occurs to me that I might have enough for a small shawl... hm...

Saturday, February 16, 2013

FO Flashback: previously-seen projects

This is my third and last FO Flashback post for February. In this one I'm looking back at the projects I made during the time that I've been writing this blog, and giving a little update on how they're being used (or not) these days.

First, I want to mention that February is my knitting anniversary month! It was in February of 2011, after years of believing that I was going to be a crochet-only person for life, that I got myself some needles and learned to knit and purl. My early efforts are immortalized in this post.


In February of 2012, my only knitted FO was my cozy for my iPod, which I blogged about here. At the time, my iPod was living in my work bag, and it wore its little sweater every day for months. The cozy did a good job of keeping my iPod cushioned and scratch-free, although it was a little annoying to have to scrunch it down whenever I wanted to see the screen or use the volume control. Now my iPod lives in my desk drawer, and hangs out in there naked, because of the aforementioned annoyance. If I take it outside with me, though, I still put its cozy back on. That picture was just taken today, so as you can see, it's held up pretty well.


I finished my granny afghan on the same day as the iPod cozy. I love this blanket so much more than I thought I would, when I first started it just to use up a bunch of stashed acrylic! It's been living on the couch permanently since the weather got cold, and the best part about it is how much my cat loves it. We didn't even have a cat when I made it, so that's a nice surprise! The only problem is that it has some little threads pulled up from her getting her claws caught in it, but since it was just a quick and simple stash-buster, I'm not (too) upset.


And finally, the Phannie hat. My sister requested this... and then moved to Texas a few months later. So, I don't think it's gotten a whole lot of use. She is wearing it in one of her profile pictures, though, so at least I get to see it when I chat with her. I did like making it, and it gave me the confidence to make a couple more hats last year.

Friday, February 15, 2013

FO Flashback: awesome dragon!

Snow dragon

This guy is so exciting that I had to give him his own post. I love this dragon, and out of everything I've crocheted from a pattern, he is definitely my masterpiece.

Snow dragon

The pattern is Christina Powers's Asian Dragon. If you look at her pictures, you will immediately notice that my dragon doesn't look a whole lot like hers. If you look at the 90+ other projects made with this pattern, you will notice that almost none of them look like hers, and a lot of comments saying "I don't know how to get my dragon into the same shape as the one from the pattern pictures." I still don't know, and I have kind of mixed feelings about this pattern. On the plus side, the finished product is intricate and beautiful, and the pattern is well-written, very long and detailed and includes a tutorial for the weird backward crocheting. On the other hand... that weird backward crocheting. If I recall correctly, that's what's supposed to give the dragon's body its bendy-twisty shape, but I just couldn't get that to happen. Maybe I and almost all of the people who have made this misunderstood the instructions, but... I kind of doubt that. It's a little disappointing, because I think there are easier ways to shape crochet that would result in the dragon body that nearly everyone seems to get from this pattern anyway.

But! That is not to say that I regret using this pattern or that I'm not happy with this dragon, because I love him! He lives on my amigurumi shelf, a little away from the others because he is, frankly, more awesome.

Snow dragon

I finished him during the week I was off work for Snowmaggedon in 2010, which gave me a great opportunity to photograph him in the snow. These pictures still make me happy.

Thursday, February 14, 2013

FO Flashback: amigurumi

I love listening to the Commuter Knitter podcast because Jen is full of great ideas. Not only did she inspire me to start watching The Big Bang Theory and to weigh my FOs and stash, she also thought of a new segment for her podcast where she revisits her older FOs and reports on how they're doing. I love the idea, and I want to do something similar here, since I've been crocheting for several years longer than I've been blogging. So, I plan to spend a few days each month showing you the crocheted and knitted objects I finished during that month in previous years. If I already blogged about it, I'll just post a quick update, but if it's a project from before 2011, then I'll also do a little review of the pattern and the process of making it, like I usually do with my project posts.

In 2008 and 2009, I was still almost exclusively an amigurumi-maker, so from those years I have a bunch of little critters to show you:
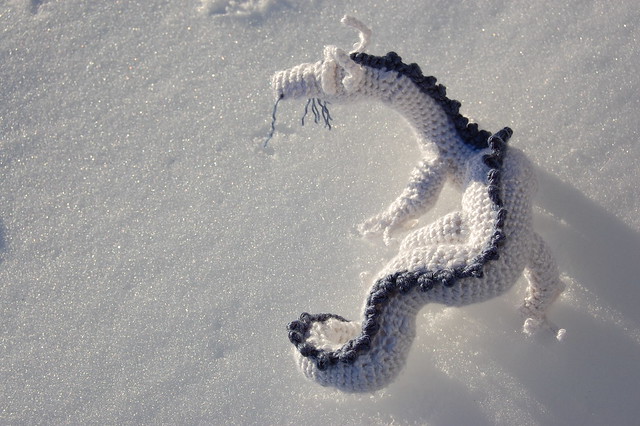
Steph's dragon Elephant Heart Fox

The baby dragon was a birthday present for my sister in 2008. I don't remember whether he lives with her now or if he stayed home with our parents, but the last time I saw him he was in the company of some other crocheted buddies I made, so I imagine he's doing well. I loved making that pattern (Baby Snow Dragon by Marjorie Jones), and in fact I made three other dragons with it. For a new crocheter, it was great, because it was pretty simple to figure out but felt excitingly complex with all those little pieces and that cute shaped face.
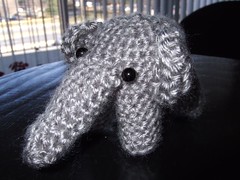
The elephant (2008) and 
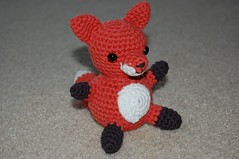
fox (2009) were little gifts for friends that I haven't been in touch with, so I don't know how they're doing! The fox is another great amigurumi pattern (Fox Amigurumi by Nimoe), again pretty simple but with nice results. The little elephant (Pocket Elephant by Brigitte Read) was more challenging to figure out, especially when I was still a beginner. There are other lil' elephant patterns that I would probably suggest over that one. And the 
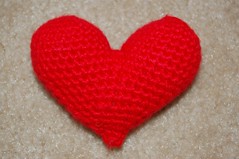
heart (2009) is not really a critter, although I did consider giving it eyes. It sits on my shelf of amigurumi, kind of tucked behind everyone else because I don't really know what to do with it! If I were making the pattern again today, I would probably go ahead and give it a face, and/or stuff it with catnip for my kitty. The pattern (Corazoncitos by Mia Zamora Johnson) has instructions for three different sizes, so there's a lot of possibilities there (maybe a mobile, or Valentine's Day decorations?).

Speaking of Valentine's Day, my one crocheted FO from 2011 was my card that I made for my boyfriend:


This pattern is by June Gilbank and it's another heart pattern that includes three sizes. I made all three, then used invisible (clear plastic) sewing thread to stitch them onto a piece of gray cardstock, which I then attached to a white card I had made. My boyfriend still has this card stashed somewhere.

Since this post is already a little long, I'll save a couple things for later: one of my absolute favorite projects I've ever done, plus checking back on the things I already blogged about.

Wednesday, February 13, 2013

Second-ever pair of socks, complete!

Good news! I've finished another pair of socks, and they have been approved by my kitty!


I just realized that I never mentioned casting these on, I guess since I started them during my little unplanned blogging hiatus in January. So let me start with a picture of the skein, which is Aurora Gnomealis by GnomeAcres. I fell in love with this colorway as soon as it was introduced, and had to wait through a few shop updates to get my hands on a skein.


The pattern I used was Vanilla Latte Socks. It's a top-down pattern, which made me a little nervous since my only other pair of socks were toe-up. Turns out, though, that I had a much easier time understanding the construction of these socks. I think a large part of that is due to having already made a pair of socks, but something about working these socks top-down and trying them on as I went made a lot more sense to me than trying socks that I was making toe-up. With the toe-up socks, especially because it was my first sock attempt, I didn't really have any idea how big or long the toe was supposed to be, since I didn't understand the anatomy of a knitted sock. With my new socks, I felt that somehow starting from the cuff and going down felt a lot more intuitive.


There was one line of the pattern that I had trouble with, and I think this is due to me still being new to sock knitting. When you finish the heel turn, the part where you knit around and pick up the gusset stitches either had me knitting "backwards" around the sock, or being one line off from the instructions when it was time to knit in pattern again. It's hard to explain and I don't know what happened, but it turned out fine. (I'm very proud of myself for not repeatedly undoing my work to fix teeny-tiny mistakes that no one but me will notice and even I have mostly already forgotten about.)

These ended up only a little smaller in length and width than my Naruto socks, but I like the fit much better (sorry, Naruto socks). I can't wait to make my third pair.

Monday, February 11, 2013

Organizing!: Ravelry stash

I adore Ravelry for many reasons, not least of which is the insane levels of organization it encourages. Quite a while ago, I photographed and cataloged my entire yarn stash, and I've done a pretty good job of keeping it updated. If you link to yarn that's in your stash when you create a project, then Ravelry will keep track of how much of that yarn you have left based on your project's yardage (if you enter it), and link to any projects that used that yarn on the yarn's page. I love looking at the page for one of my skeins and seeing all the projects I've made with it, especially my lovely acrylic that I used for multiple amigurumi (and still haven't used up, ugh).

One thing that bothered me, though, is that I didn't have an accurate way of measuring how much yarn I had used in my projects, and how much yarn I had left in my stash. So my stash page on Ravelry was good for keeping track of the yarn I own, but it wasn't actually a good representation of how much I really had.

Then, I got a kitchen scale for Christmas!


Jen of the Commuter Knitter podcast mentioned recently that she has been weighing her projects and using that to keep her Ravelry stash up-to-date, so I was inspired to spend my Saturday afternoon doing the same thing. I tracked down all of my projects that I haven't given away, starting way back with a crocheted bag from 2008, and weighed them. Then, based on Ravelry's data about how many grams are in a skein of the yarn I had used, I calculated how many skeins my project had taken. Now, many of my project pages have accurate yardage on them! Yayyy! And, I know almost exactly how much yarn I have left over from those projects in my stash! Yayyy!

Many of my acrylic skeins unfortunately can't benefit from the same automagic updating, because I used them for multiple amigurumi. I can't weigh those, because they have been given away, they use yarn from multiple skeins, and/or they're stuffed so I can't weigh the yarn alone. So, I just weighed the remnants that are left in my stash, and calculated how much of a skein I have of those. I put that amount into Ravelry as my "amount stashed," which isn't exactly how it's supposed to work - ideally, you start with the number of whole skeins you originally had, keep track of how much you use in your projects, and Ravelry calculates your current amount stashed from there. The way I'm doing it for my acrylic partial skeins, I'll have to manually update it if I use some of that yarn. Not a big deal, though.

Now that I have a pretty exact idea of how many yards I have of all my yarn, I can do some advanced searches on Ravelry for projects that will use up x amount of y weight yarn! Even though working from my stash doesn't inspire near as much excitement as buying new yarn, I had so much fun last night looking for patterns I can use. I'm linking to possibilities in the notes section of each yarn's page, so I'll remember them when I decide it's time to use some stash. I love Ravelry.

Sunday, February 10, 2013

Organizing!: Pinterest

I love organizing. I will happily organize almost anything, whether said things belong to me or not. I also get a kick out of organizing non-tangible things, like the files on my computer and, especially these days, the many, many bookmarking and sharing sites I use. Since I've been active on Pinterest for more than a year now and hadn't done an organizing sweep on there yet, I decided it was time. Luckily I have only a few hundred pins, not thousands, so this wasn't too daunting a task.

Pinterest's somewhat difficult relationship with issues of credit and copyright has made me a little uneasy from the beginning, but since pretty much everyone else was just happily pinning and repinning without worrying too much about it, I went along with it. A large part of my recent organizing, though, was tracking down and giving credit to original creators. It's really not hard, and I think it's the right thing to do.

So, what I did was:

  • For each pin, I checked the link to make sure that it still worked, and that it went to the page where that content or image was originally posted. If you spend much time trying to get to actual websites from Pinterest, you can probably guess how this went.
  • If the pin didn't link to a "real" website (if it just went to an image search result, or an arbitrary page of a tumblr, or something like that), I tracked down the site that the content originally came from. The easiest way to do this is to use Google Image Search:
  • Click on the little camera icon in the right side of the search bar, and you can paste in the image's URL. Then Google will search for that picture and return websites that have the same or similar images on it. When the top page result is somebody's Flickr account, as in this example [edit: I just noticed that the link actually is to someone's Flickr favorites, but from there it's easy to get back to the original photo], then I could be pretty sure I had found the original creator. Sometimes it was a little more tricky, but usually either going to the website that hosted the largest version of the image I was looking for, or to the oldest website, was successful.
  • Then, once I had found the original website, I edited that pin and changed the website to the link I had found. In some cases, I just deleted my old pin and created a new one with the correct link.
  • There were a few times that I just couldn't find an original creator. In those cases, I tried to at least find their name to put in the pin's description, or to change the link to the earliest source for that content that I could find.
  • There were also a few pins where I found the original creator's Flickr page, but they had not enabled pinning their photos. In those cases, I deleted my pin. 

But I did not stop here! Another bad Pinterest habit I've fallen into is just leaving whatever description happens to be on the pin when I repin it to one of my boards. A lot of people do this, leading to some bizarre situations if you assume that the description on the pin is what your friend actually had to say about it. I do a lot of my Pinterest browsing on my iPad, so it's much easier to just repin and not type in a new description of my own, but it was starting to bother me that so many of the descriptions on my pins were things I would never actually say! So, I went through and fixed that too.

Then, just to do a little more tidying, I unfollowed a few boards that my contacts pin to. I'm not that interested in elementary education, paleo diets, fitness (sadly), crafts for toddlers, or some of the other things my friends are into, so I just unfollowed those boards. Much better! Now my pins are all, to the best of my ability, correctly attributed, and they have my own comments on them, and my main feed is mostly just stuff I actually want to see. Ahh, organization.

Wednesday, February 6, 2013

Slippersocks


My other holiday-vacation-knitting project was a pair of slippers for myself. A quick and easy knit with a pretty end result, right? This is true, in theory. By the time I was on to the second slipper (which was actually the third slipper I attempted), it was indeed quick and easy and pretty and took only a few hours of work. But, just for my own amusement/torture, I'll list out all the steps that finally led up to these slippers existing:

  1. Crochet a scarf with yarn that turns out to be too scratchy to wear on your neck, and using a pattern that you don't quite understand, so that the scarf turns out odd.
  2. Let this scarf hide in shame for several years.
  3. Frog this scarf in an out-with-the-old, in-with-the-new frogging party.
  4. Eventually decide that this yarn shall become slippers; pick a pattern and get started many months later.
  5. Reconsider the wisdom of attempting to felt when you've never felted anything before and don't have access to your own washing machine that you can babysit during the felting process.
  6. Frog again, and pick a new pattern, and then when you decide you don't want to do any seams,  another new pattern.
  7. Finally get started!
  8. Misunderstand the instep instructions. Rip that part out and try again.
  9. Realize you are not continuing the twisted stitches up into the instep. Rip that part out and try again.
  10. Get the instep wrong again for no discernible reason, at least seven more times.
  11. Get mad and rip everything out. Start again.
  12. More mistakes! Put the naughty slipper aside and just cast on for the second one.
  13. More mistakes. Finally, finally, finally, make it all the way up the cuff.
  14. Cast on for the second (third) slipper and complete it easily, now that you've memorized the entire pattern from doing each part at least five times.
  15. Triumphantly wear the slippers every day for the rest of your life.
Now that I'm finally on Step 15, I do really like these slippers. They are warmer and cozier than regular socks, but snugglier than regular slippers. Mine did turn out a bit too big, despite making the small size, but they're not unwearable. I would definitely like to make these again, using a less bulky yarn to get the sizing right. I think they'd make nice gifts, too. And I'm reasonably confident that I could make another pair very quickly and easily at this point.

Tuesday, February 5, 2013

Star blanket

My apologies for another long and inexplicable silence! I thought I would at least get another post up in January, but somehow we're already several days into February.

I haven't posted yet about the projects I worked on over the week and a half that we spent traveling for the holidays, so I'll start with this:


Crocheted star blankets pop up pretty regularly on Ravelry and on crochet sites, and they have always intrigued me, but I didn't know or have any small children of my own and I wasn't sure a bright, star-shaped little blanket was really something I needed for myself. Now I have a cat, though, and she loves blankets, especially ones I've crocheted. (My granny square afghan lives on the couch these days, and Juniper will always and only lie on it, even if it means squeezing on to the tiny corner of it that's not being used by someone else.) I wanted to make her a blanket of her own, so a star afghan, using some bright pink and purple acrylic that I bought on a whim, seemed perfect.


I think she agrees.

The particular pattern I chose is the Chromium Star Blanket by Laura Lynn Hanks. I picked this one for Juniper because it modifies the traditional ripple pattern to make a solid piece, rather than having the usual small holes at the peaks and valleys. I thought a solid blanket would work better for a cat - fewer places for tiny toes and claws to get caught.

Don't tell Juniper, but I did misread the pattern, and the blanket is a tiny bit awkward as a result. Every three or four rows, you're supposed to make fewer dcs in the points, which keeps the rows from expanding too quickly and getting rumpled. I anticipated this problem, but due to reading the pattern on a teeny, tiny smartphone screen, I didn't notice the fix for this that the designer cleverly put in the pattern. It would be nice if it was highlighted or something, because the written pattern is very repetitive, but I can't blame the formatting. When I finally noticed what I was doing wrong, I was on the verge of ripping out almost the whole thing, until I remembered that this was for a cat. I don't think she noticed the rumples.